So what do stupid stubborn people with only a dated msiwindosx86 and iDeneb 10.5.4 that wouldn't even boot, do?
They try and try until they
Create an OS X Leopard Installer out an external HDD.
Disclaimer: exactly stupid stubborn person, me, did not think up this brilliant idea; I got it from here.
What you need: HP Mini's bios should be F.05 for this to work according to sources.
1) A working Mac. I don't have a real Mac so I used my MacBook Wind which is currently happily running OS X 10.5.6.
2) External hard drive. I ripped off my ancient lappie's 20GB ATA (yes, ATA, not SATA) and dumped into one of those cheapo 2.5" external HDD cases.
3) Retail OS X Leopard DVD Installer. Again, I don't have this nor can I download it, so I'm left with my msiwindosx86 and iDeneb-10.5.4-I-think DVD's.
4) Universal installer from PCWiz (I'm totally digging this site!)
5) HP Mini plugin for Universal Installer. This one's from Res over yonder at insanelymac.com. This plugin should be saved in the "Universal installer/Motherboards" folder.
6) Leopard 10.5.6 combo update from the Apple website.
What to do:
1) Plug in the external HDD to the mac and then launch the app "Disk Utility".
2) Partition the external HDD as GUID partition and format Mac OS Extended (journaled).
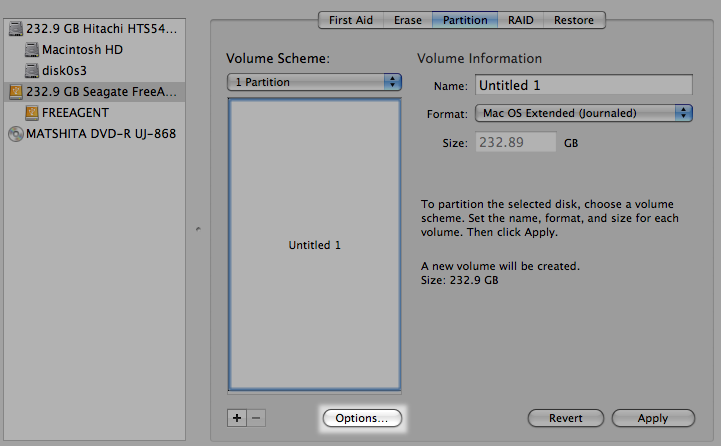
- In the Disk Utiliy window, at the left side, click on the external HDD's icon (usually depicted as a yellow-orange disk),
- At the right side, you click on the tab called "Partition". (If you don't see the tab, then you're not on the "main" external HDD. Click on the first, upper most yellow-orange disk icon and at the right of your Disk Utility window should change accordingly to show the tab).
- In the drop-down menu, choose 1 Partition. Give it a name. System automatically give you "Untitled 1" by default. (Quite imaginative huh?)

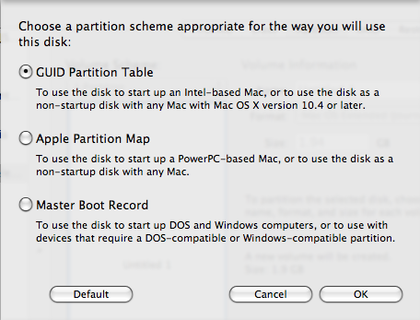
- Click on the "Options" button. This will bring up a menu. Choose the radio button that says "GUID Partition Table". Click on OK.

- Back on the main window, click on the "Apply" button. You can now close Disk Utility.
3) Insert and mount the OS X DVD installer and then launch the app "Terminal"
4) In Terminal, type this line:
cd /Volumes/Mac OS X Install DVD/System/Installation/Packages
Or, if you're using msiwindosx86 DVD:
cd /Volumes/Mac OS X Install DVD Slipstream/System/Installation/Packages
5) Hit Enter and next, type this line:
open osinstall.mpkg
6) Hit Enter. The Mac OS X Installation program should start, showing you a window. Just choose your external HDD.
7) If you're using Retail OS X DVD Installer, skip this step. If you're using a iDeneb or any customized OS X Installer DVD, before starting the actual installation, click on the "Custom" button and uncheck Kernel patches and other stuff, like additional languages to save space and time during installation.
8) After installation is done, double click on the 10.5.6 combo update package and select the external HDD.
9) Start Universal Installer. (You should've installed the tools/utilities on your Mac when you started this)
From Res's guide:
*You're now in the Universal Installer window
1) Change HD to your USB device.
2) Select motherboard package with X86_Essentials and select apply kext package then click install.
3) Select motherboard package with HP_mini_1000_F.05-10.5.6.
4) Select apply kext package and DSDT patch.
5) select ethernet EFI string and EFI string for video card (intel GMA 950).
6) Click install.
7) Select PC-EFI V9 then click install again. (In order to reduce the possibility that PC-EFI could be installed not correctly. I prefer to install it separately.)
8) Launch DiskUtility and fix the permission of your USB device. Done.
9) Now, congratulation, you have made a bootable USB device. Reboot your computer with F9 and select your USB device as boot disk then boot with "-v -f". Now you are able to boot into your OSX on your USB device.
What I did after my Step #8 because I wasn't able to download Universal Installer and Res' HP Mini plugin for Universal Installer.
1) Launch OSX86 Tools Utility. Get it from PCWiz Computer site.
2) Click on "Intall EFI/Run FDISK" button. It'll ask you some questions (I, in particular, don't understand what they're talking really about) so just OK it and type your password when it asks you so.
3) A new smaller window will come up. In it, click on the "Run script" button. Again, just type your password and hit Enter to confirm if you're asked to.
4) Terminal will open. Confirming what you're about to do. Just hit Enter or "y" then Enter. It will present you with a list of actions to do. Choose 4 (Chameleon EFI) and press Enter.
5) It'll take a couple of seconds then you'll see a list of drives in your system. Usually, the external HDD will be listed as disk1. So just type "1" and hit Enter.
6) You'll see some texts running in the Terminal window and then a confirmation that you're done. Close Terminal and you should now have a bootable external HDD with OS X in it.
But since I didn't exactly follow Res' guide, especially the part with the Universal Installer and HP Mini plugin involved, I did not succeed at all and got stuck at the exact line I was dreading.
"MAC framework successfully initialized using 5242 buffer headers and 4096 cluster IO buffer headers."
Bleh. Well, at least I still have one more straw at this by downloading the Universal Installer and Res' HP Mini plugin before I quit being stupid and stubborn and just get iDeneb 10.5.5.


